Picture a stereotypical Seattle couple. They own a Subaru, use shampoo you can also eat (goodness knows why), and love the great outdoors. Well, we don’t own a Subaru, but my wife, Daniela, and I match the rest. Over the past two years, we’ve gone from poorly-prepared novice hikers, to kitted-out trail regulars.
Learnings on the trail
Over the many miles, I’ve learned some lessons about hiking. Conveniently, they are useful parables for life.
For example:
- 1Planning ahead is crucial (know your route, pack well), but once you’re going, just focus on each forward step (to avoid a wrong one or turned ankle).
- 2The hardest parts are often the first 100 steps (packs are heavy, loads unsettled), and the last 100 before the top (tired legs, foggy mind).
- 3Most time on the trail blends into a blur, but certain moments will stay with you forever.
This past weekend we decided to take our regular day-hikes to the next level and stay overnight. Neither of us are campers, largely due to some light childhood trauma (sub-zero nights with the Boy Scouts for me, rain and mud-soaked trips for her). So this was a big step for both.
Like any clueless newbie, we began our journey with two places: REI (we live in Seattle, after all) and the internet.
Gear
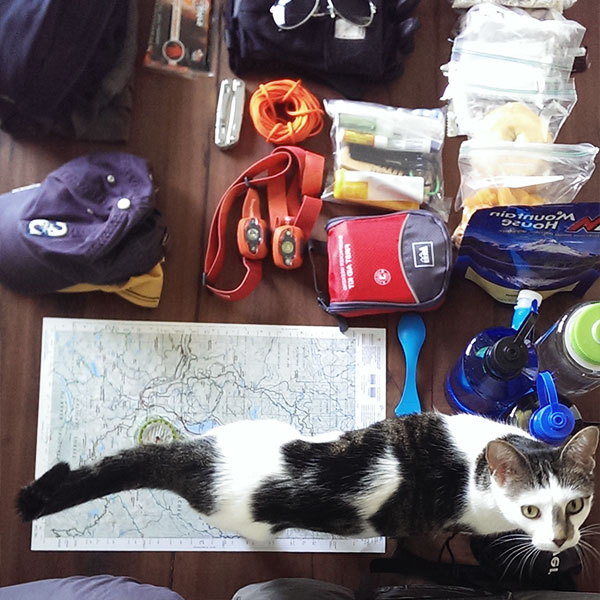
As the Swedes say, “There’s no bad weather, just bad clothes.” As our past camping experiences showed, there’s much truth in this. We started with REI’s helpful Backpacking Checklist. It is a great overview of what you need, but leaves the specifics up to you. Here’s the gear we chose:
Tent
We tried standard two-person tents in the store and found them too short for me and too narrow for both, so we went with a two plus. Based on online reviews and a good value for money, we settled on the REI Half Dome 2 Plus. Our experience (one dry night) was positive. While on the heftier side (5lb 7oz) compared to smaller or more expensive options, it is easy to set up, seems sturdy, and kept us warm in the sub-40 temperatures late at night.
Sleeping bags
Even hot days lead to cold nights in the Pacific Northwest, so a good sleeping bag is a must. Based on REI recommendations (you’ll see a trend in this), I chose the Kelty Ignite Down 16. As a down sleeping bag, it is light and packs tightly. Daniela went with the Mountain Hardwear Laminina Z Flame, solely for the name. Joking. It was REI-recommended of course. She found it very warm, though since the filling is synthetic, it is heavier and a bit bulkier than a down bag. It includes a compression sack (straps that tighten the bag, cinching it smaller), so it ends up about the same size as mine.
In addition to her bag, Daniela also got an REI air-filled sleeping mat, while I roughed it without a mat. This was another quality idea by my wife (a second trend here), particularly since it packs small and light. Without a mat, the ground was bumpy, as expected, but was also surprisingly cold. Down provides limited insulation when compressed, so the night-chilled earth was all too noticeable. I’ll be purchasing an insulated mat by our next trip.
Backpack
Originally I argued for a jury-rigged day-pack over a proper camping backpack to save money. Intelligence (namely, my wife) prevailed. Stopping by REI, pack-expert David walked me through my options. He loaded each pack up, 15 then 25 pounds, and I walked the store to feel the fit. After some deliberation, I settled on the Osprey Aether 60 (the 60 refers to the number of liters the main pocket can hold). It fit well, has solid reviews, and the mid-range price wasn’t wallet-busting. The bag is mid-size for backpacks, and I’m a bit worried it will be tight for multi-day trips, so I may upgrade to the 70 or 80 liter version.
It was interesting moving from day-packs to a proper backpack. Instead of resting on on your shoulders, the bulk settles on your waist. Going from 10lb day-packs to 25lb backpacks wasn’t nearly the challenge I expected. It is very important to balance the weight however. Heading up, I was lucky to get the balance just right. On the way back however, the center of gravity was too high and my shoulders suffered for it. Packing remains a dark art, but YouTube videos and experience are helping me improve.
Eating
Food is one of the areas where we look forward to experimenting. The initial investment is low and each trip you get to make new choices on what to bring.
The food
For our first trip, we kept it pretty simple. ReviewOutdoorGear, a YouTube channel, has an overview on what food to bring, which we found useful. A particularly good tip is to eat sugars during the day for quick energy and fats for dinner, to burn at for warmth while sleeping. A few learnings from our first experience:
- An age-dried salami roll was compact, delicious, and filling.
- Mountain House dried beef stroganoff was surprisingly tasty and easy to prepare. However, despite being billed as “two servings”, it left both of us hungry. At $8 each, they’ll start getting pricey.
- Morning tea. Perhaps a little luxury, but what’s better than waking up after a cold night to stunning natural views and a hot cup of tea?
- For snacks, nuts, dried fruit, and Snickers bars (my fav) kept us energized while hiking.
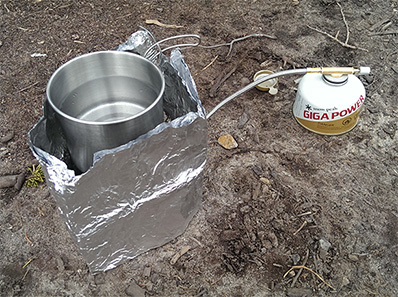
Cooking it up
ReviewOutdoorGear also had a review of a super-cheap ($20, as of writing) cooking stove, which was a lot less costly than most other options. The stove is light, compact, and worked well. Since it is an open flame, and highly susceptible to wind, I made a wind-shield out of tin foil. This helped concentrate the heat, speeding cooking time and saving fuel.
Everything else
To round things out, we finished off with…
- Compass and map: Naturally.
- Leatherman multi-tool: We probably won’t use half the features (who needs a screwdriver while hiking?), so I expect we’ll get separate tools in the future.
- Water filter: Essential to avoid carrying 30lbs of water. I found it slow to process the water, but it is small, light, and easy to use.
- First-aid kit: The only thing we carry which I hope to never use.
- Headlamp: Fun and surprisingly effective when heading into dusk and darkness.
- Paracord: We used this to hang our food to avoid bears, but is also good to have around.
- Clothes (of course): Lots of decisions go into this which I won’t cover here. Basically I focused on: layering for the hike and plenty of warmth for the cold night.
- And various other miscellaneous items.
The Hike
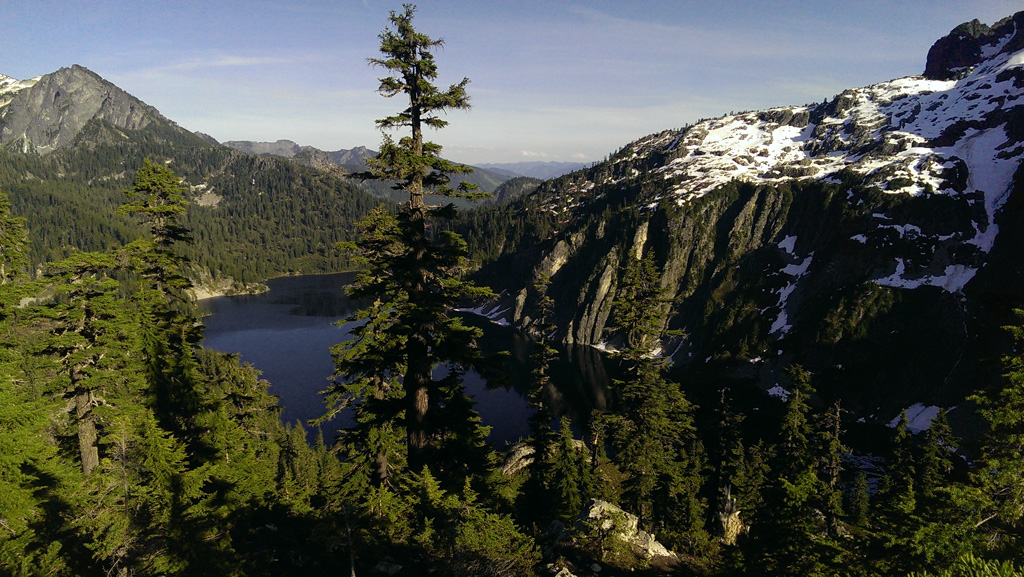
Snow Lake is one of the most beautiful and accessible hikes in the Cascades. The walk up provides sweeping views of mountains, then just over the saddleback you descend into the stunning lake basin. On a sunny weekend, it is also one of the most popular hikes in the area. To get a little distance from the crowds, we decided to continue our hike another couple miles up to Gem Lake.
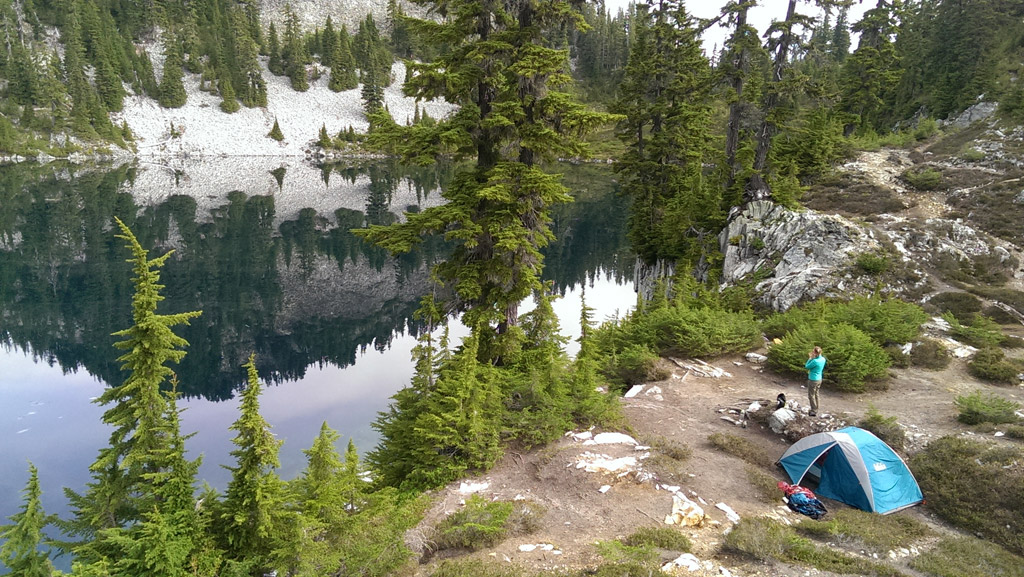
The trail is well-maintained and moderate difficulty at worst. Watch for false turns since there are many well-trod spurs to look-out points which will lead you astray. Often these false trails will be marked with a small stack of rocks to encourage you to stay on track. Despite arriving close to 5PM at Gem Lake, there were several good tent spaces still available. We made camp, cooked dinner, and set about the hard work of relaxing beside the lake.
If staying overnight at Gem Lake, I highly recommend taking some time to explore the area. There are several promontories which provide expansive views of Snow Lake and the surrounding mountains.
Don’t over-step the small details though. Mountain flowers tuck into cracks, providing welcome splashes of color against the white snow and gray rock while waterfalls cascade through narrow cravasses, feeding the watershed below.
Our preparation and quality gear resulted in an enjoyable start to our backpacking adventures. Any good trip also brings new lessons, and there are several areas of improvement for our next trip. For one, I’ll be buying a mat for my sleeping bag.
Great post, very thorough and some solid tips that often get overlooked. The backpack comment “a jury-rigged day-pack” really stood out, shouldering that all day is serious pain. For my part a 60-65? liter was overkill in Japan, which was really glorified day trekking, but having the weight well distributed made a huge difference.
Yeah, I never appreciated the importance of a good pack. Somehow my $40 back from boy scouts didn’t prove all that comfortable.
Good to know on the pack size. After some deliberation, and asking people more experienced than myself, the 60 should be more than enough. I’ll attached some things to the outside (tent most likely) and just get better at packing the rest inside.
I enjoyed reading this. Now I understand things better. :-)